linux基础:防火墙配置详细步骤
前言
此实验准备两台虚拟机便于调试,一台CentOs6,一台红帽6
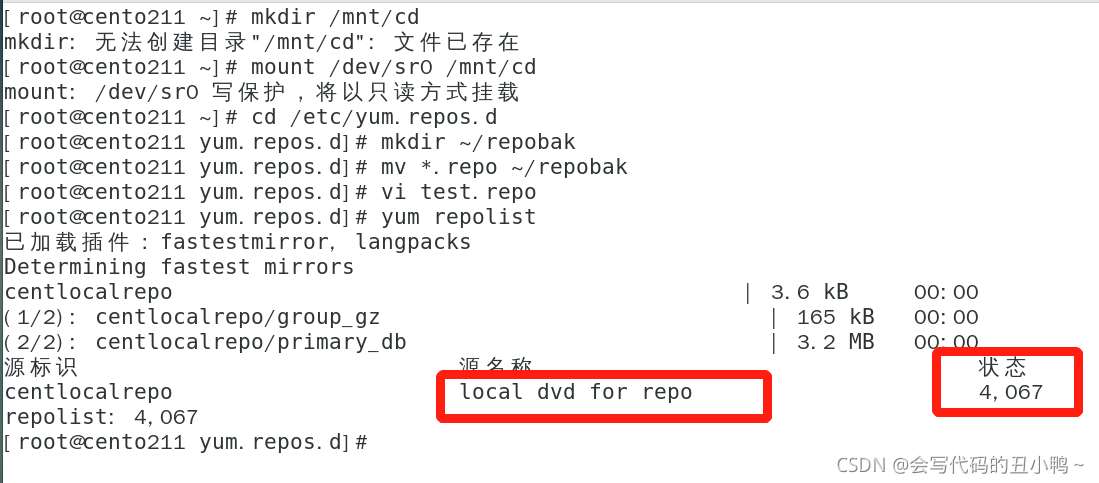
1.首先确保yum仓的配置是否完好(CentOs6)
2.要求在centOs6中安装httpd和mod_ssl软件包
[root@cento211 yum.repos.d]# yum -y install httpd mod_ssl
3.在CentOs6中启用httpd.service并使其开机自启
[root@cento211 ~]# systemctl enable httpd.service
Created symlink from /etc/systemd/system/multi-user.target.wants/httpd.service to /usr/lib/systemd/system/httpd.service.
Created symlink from /etc/systemd/system/multi-user.target.wants/httpd.service to /usr/lib/systemd/system/httpd.service.
[root@cento211 ~]# systemctl start httpd.service
4.在web内容的开发者完成Web应用之前,使用Congratulation!来提供占位符页面
[root@cento211 ~]# vim /var/www/html/index.html
Congratulation!
查看应用web页面的编辑内容
[root@cento211 ~]# cat /var/www/html/index.html
Congratulation!
Congratulation!
5.启用和启动firewalld服务
[root@cento211 ~]# systemctl is-enabled firewalld
enabled
enabled
6.在CentOs6上的firewalld配置对所有未指定连接使用dmz区域
(1).首先看Firewalld的默认区域
[root@cento211 ~]# firewall-cmd –get-default
public (是默认的public区域)
public (是默认的public区域)
(2).使用dmz区域
[root@cento211 ~]# firewall-cmd –set-default-zone=dmz
success
success
(3).查看此时的默认区域
[root@cento211 ~]# firewall-cmd –get-default
dmz
dmz
7.打开两台虚拟机,分别查看虚拟机地址

8.来自子网10.1.1.0/24网段的流量路由到work区域
[root@cento211 ~]# firewall-cmd –permanent –add-source=10.1.1.0/24 –zone=work
success
success
9.重置
[root@cento211 ~]# firewall-cmd –reload
success
success
10.查看此时的source
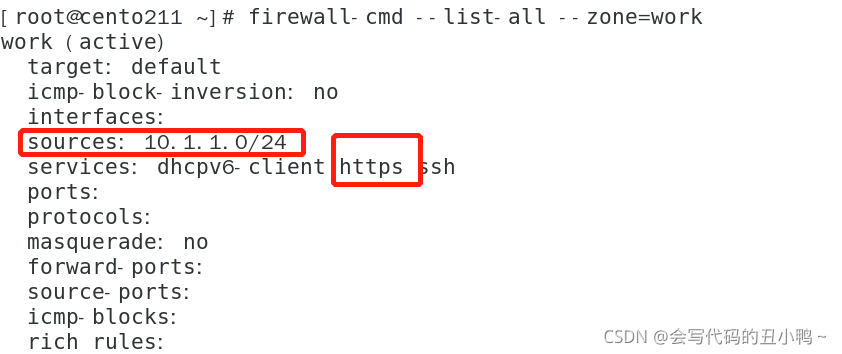
[root@cento211 ~]# firewall-cmd –list-all –zone=work
work (active)
target: default
icmp-block-inversion: no
interfaces:
sources: 10.1.1.0/24 (这个就是我们配置的地址)
services: dhcpv6-client ssh
ports:
protocols:
masquerade: no
forward-ports:
source-ports:
icmp-blocks:
rich rules:
work (active)
target: default
icmp-block-inversion: no
interfaces:
sources: 10.1.1.0/24 (这个就是我们配置的地址)
services: dhcpv6-client ssh
ports:
protocols:
masquerade: no
forward-ports:
source-ports:
icmp-blocks:
rich rules:
11.work区域应打开Https需要的所有端口,并且对所有未加密的http流量进行过滤
(1).首先打开Https服务
[root@cento211 ~]# firewall-cmd –permanent –add-service=https –zone work
success
success
(2).重置
[root@cento211 ~]# firewall-cmd –reload
success
success
(3).查看此服务被启用
12.在另一台虚拟机红帽6上查看yum仓是否完好
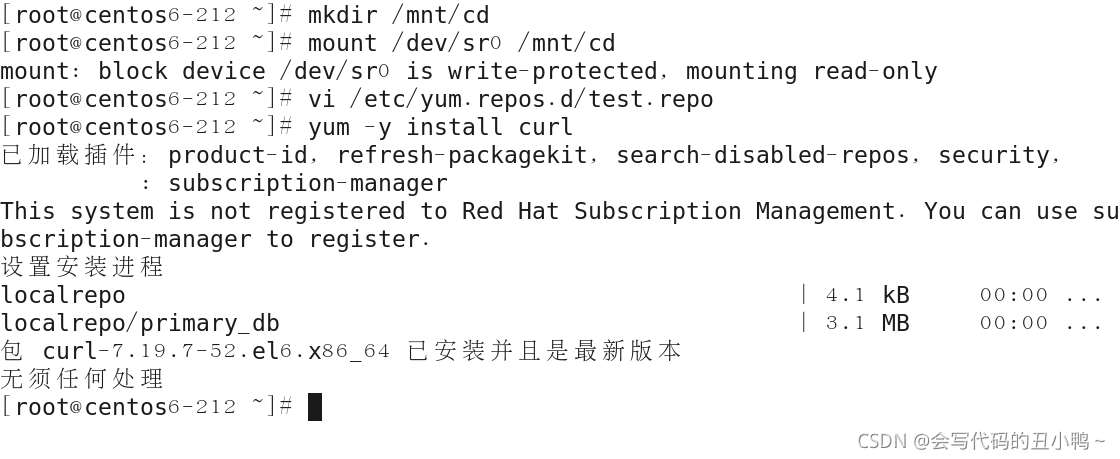
13.在红帽6中使用curl 来对服务器进行测试,测试https://10.1.1.211
[root@centos6-212~]# curl -k https://10.1.1.211
Congratulation!
Congratulation!
14.网页测试

到此这篇关于linux防火墙配置(基于yum仓的配置)详细步骤的文章就介绍到这了,更多相关linux防火墙配置内容请搜索以前的文章或继续浏览下面的相关文章希望大家以后多多支持!